This past week we worked hard to get all our systems modeled in Solidworks. We divided the team into 3 groups, Drivetrain, Lift and Hatch gripper. Every team focused on their part of the robot to make sure everything would be ready for production.
Drivetrain
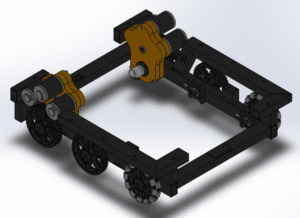
Previous Sunday the drivetrain had to be finished for production so we could send the parts we need, like the frame and the custom gearbox we made this year, to our partners in order to begin manufacturing. If this deadline was not met it would mean a big setback in our planning. Luckily, through a lot of effort over the past week, the drivetrain-team managed to finish the complete design for the drivetrain on time. On time in fact, that everyone even got a good night’s sleep. Now that manufacturing has begun the team is waiting for the frame to be welded and anodized and the ordered parts to arrive at the building location. But, waiting doesn’t mean the team is doing nothing, at Fontys we started making our own spacer rings out of POM and also laser cut and bent our electrical plate out of aluminum. The gearbox has been CNC’d, just like the bearing blocks. If we keep up the good work one of our drivetrains will be assembled coming weekend!
Lift
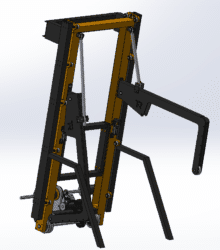
The Lift is a challenge because we want to make it so that it is able to lift the hatches and be the climbing system at the same time. A section of the lift will go downwards making the rest of the robot rise into the air, and therefore we can climb level 3. It will also have arms resting on the lift which will fold out at the end game allowing us to stabilize the robot while climbing. It will also use the center of gravity of the robot to assist in this.
Currently, we have a 2-stage lift with a carrier for our hatch mechanism. The first stage will be made from 20x50x3 beams that will have custom bearing blocks mounted onto it for the second stage lift. The second stage lift will use a U profile beam to hold the carrier. We made this decision to ease our carrier attachment but also to create more room on the outside of the lift. This presented another challenge; making bearing blocks small enough to fit into the U beam but still able to mount on the carrier. We also had to make sure we could tension 2 bearings within the block – to allow smooth movement within the lift. The bearing blocks took the most time to make out of everything on the lift itself as they are crucial for a smooth moving lift. We had to account for the climbing mechanism, the sturdiness of the block, and the positioning of the block as well.
All in all, it has been a difficult process but with hard work and dedication, we were able to get very far and are now completing the smaller details. At starting configuration, the top of the lift will be at 1 meter 20 high. During the match, it will be able to reach the level 3 hatch.
Hatch Gripper
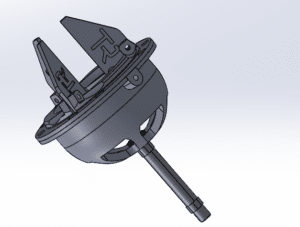
We as a hatch department understand that we have one of the biggest responsibilities, as we are hatch specialists. We wanted to create the most reliable and the most carefree system, which is ready for any possible situations that might come at matches. We started by designing a simple pusher as an outtake but as a result of testing, it was not reliable enough. After calculating, we found out the least force we need is about 150 newtons. For such a force, we need to have at least three pistons. With the idea in our head that we want to do at least 12 cycles per match, we will need to have big air storage. Therefore, we decided to change to a horizontal displacement, which will allow as to extend the gripper to the right position. For such a system, we can decrease our number of pistons and their air usage by more than 50%. We in hatch department understand our responsibility and always open to new ideas and ways to improve.
On this website, Apexdyna uses cookies and similar techniques to ensure the website functions properly and to analyze how the website is being used. More information