2019 – WEEK 3, SOFTWARE
Vision is a concept of target recognition, in which a ring around the camera sends out a beam of light to retroreflective targets in its vicinity, who send back the received beam to the camera, after which the received data can be compiled and changed to do something with it.
Vision
I started Vision coding by installing the required libraries for Python, like OpenCV and numpy for our coding language. After much struggle finding the right order of installation, we got the library working, after which we could start coding.5
We started by opening the PiCAM and putting it through an HSV filter, in which we filter all the colors except the ones returning from the vision tapes, which in our case is green. After the HSV (Hue, Saturation, Value) we blurred the image to remove some noise and rough edges. Next, we used the opening and closing variables of OpenCV to further filter out the noise inside and outside of the target to get a nice and clean black and white image to work on. Next, we calculated the contour area of each target, if it was greater than a variable we continued. Next, we created a matrix to store the angles of the targets with their corresponding x-coordinate in it, after which we drew lines and calculated the midpoints and angles of them. That is how far we are now, we still want to use the Ethernet communication set up to the RoboRIO, and fine-tune the values that are being sent.
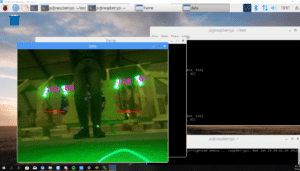
Everything vision-related is running on a raspberry-pi 3 co-processor to release stress on the RoboRIO. For a vision beacon, we used 3 green bright led rings to get enough light in the camera at a sufficient distance.
Auto-Aligning
Auto-aligning is a technique that will be used to make sure the robot is perfectly aligned to the target. Vision will send the xpixel of the mid-point of the target to the RoboRIO. In LabVIEW the xpixel will be converted to the yaw angle.
Team Rembrandts uses the Raspberry Pi Camera Module V2. The image width is 640 pixels and the horizontal field of view is 62.2° (See specifications of the camera). The camera gives that the target is at an xpixel of 100.

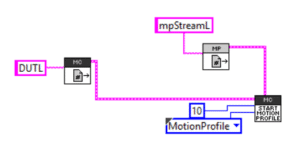
This is how the formula would look like in LabVIEW. Where X-pixel is received from the Raspberry Pi’s camera module, send to the RoboRIO and the Yaw Angle is the output which will be used as a set point.
This is the LabVIEW code for auto-aligning by manually giving the setpoint without reading the X-pixel, which is something that will be implemented soon. By pressing button 1 the NavX yaw angle resets back to 0 and by holding the button 0 on the joypad the loop will run. First, it reads the yaw angle from the NavX which will be the process variable of the PID controller and the manual setpoint is just any number of -179 to 179. -0.95 and 0.95 are values that shows what the maximum output will be for the motors so now maximum they can go is 95%. 20 is the dt in seconds. 0.1, 3 and 0.5 are values the P I and D values are given by tuning and using the graph.
Things that still have to be achieved for auto-aligning is integrating it together with vision and adding a way where the NavX resets once before it loops after pressing the button 0 on the joypad. Then make all these codes in classes.
Motion Profiling
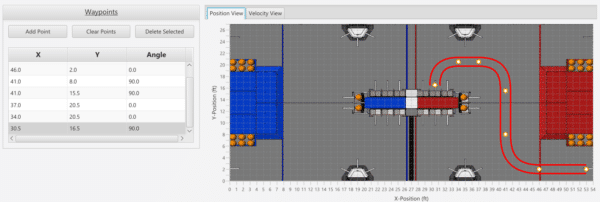
All the points will be put into a .csv file, our code is able to read out the values and put them into the motion profile buffer after some calculations converting the speed to encoder values.
We have encountered some problems on the way of creating the motion profile code, like not to be able to run a motion profile backwards after another motion profile, we made some progress by changing the setup of the motors.
For more detailed information, visit the website of Team Rembrandts
Vision is een concept van doelherkenning, waarbij een ring rond de camera een lichtstraal uitzendt naar retroreflectieve doelen in de buurt, die de ontvangen bundel terugsturen naar de camera, waarna de ontvangen gegevens kunnen worden gecompileerd en gewijzigd om er daarna iets mee te doen.
Vision
Ik begon met Vision-codering door de vereiste bibliotheken voor Python te installeren, zoals OpenCV en numpy voor onze coderingstaal. Na veel moeite om de juiste volgorde van installatie te vinden, hebben we de bibliotheek werkend gekregen, waarna we konden beginnen met coderen.5
We zijn begonnen met het openen van de PiCAM en het door een HSV-filter laten gaan, waarin we alle kleuren filteren behalve degene die terugkeren van de beeld opnames, die in ons geval groen zijn. Na de HSV (Hue, Saturation, Value) hebben we het beeld vervaagd om wat ruis en ruwe randen te verwijderen. Vervolgens hebben we de openings- en sluitvariabelen van OpenCV gebruikt om de ruis binnen en buiten het doelwit verder te filteren om een mooi en schoon zwart-witbeeld te krijgen om mee te werken. Vervolgens hebben we het contourgebied van elk doel berekend, als het groter was dan een variabele dan gingen we verder. Vervolgens hebben we een matrix gemaakt om de hoeken van de doelen op te slaan met hun bijbehorende x-coördinaat erin, waarna we lijnen tekenen en de middelpunten en hoeken ervan berekenen. Zo ver zijn we nu, we willen nog steeds de Ethernet-communicatie gebruiken die is ingesteld voor de RoboRIO, en de waarden die worden verzonden, nauwkeuriger afstemmen.
Alles vision gerelateerd draait op een Raspberry-Pi 3-co-processor om stress op de RoboRIO te voorkomen. Voor een zichtbaken gebruikten we 3 groen heldere led-ringen om voldoende licht in de camera te krijgen op een voldoende afstand.
Auto-Aligning
Auto-aligning is een techniek die wordt gebruikt om ervoor te zorgen dat de robot perfect op het doel is afgestemd. Vision stuurt de xpixel van het middelpunt van het doel naar de RoboRIO. In LabVIEW wordt de xpixel geconverteerd naar de gierhoek.
Team Rembrandts maakt gebruik van de Raspberry Pi-cameramodule V2. De beeldbreedte is 640 pixels en het horizontale beeldveld is 62,2 ° (zie specificaties van de camera). De camera geeft aan dat het doel zich op een xpixel van 100 bevindt.
Dit is de LabVIEW-code voor automatisch uitlijnen door handmatig het setpoint te geven zonder de X-pixel te lezen, iets dat binnenkort wordt geïmplementeerd. Als je op knop 1 drukt, wordt de NavX-gierhoek weer op 0 ingesteld en houdt je de knop 0 ingedrukt op de joypad dan staart de loop. Eerst leest het de gierhoek van de NavX die de procesvariabele van de PID-regelaar zal zijn en het handmatige instelpunt is gewoon elk aantal van -179 tot 179. -0.95 en 0.95 zijn waarden die aangeven wat de maximale uitvoer zal zijn voor de motoren, dus nu is maximaal 95% mogelijk.
Wat nog moeten worden bereikt voor automatisch uitlijnen, is het integreren samen met vision en het samenvoegen waarbij de NavX in één keer wordt gereset voordat de loop start na het indrukken van de knop 0 op de joypad. Vervolgens worden al deze codes in klassen ingedeeld.
Motion Profiling
Vorige week werkten we aan bewegingsprofilering, dit is een manier om de robot autonoom te laten rijden. Het volgt een voorgeprogrammeerd pad, dit pad wordt gegenereerd met behulp van een bewegingsprofielgenerator. In deze bewegingsprofielgenerator kunnen we punten toevoegen en de positie en snelheid berekenen voor elk gegeven tijdsinterval.
Alle punten worden in een .csv-bestand geplaatst. Onze code kan de waarden uitlezen en in de bewegingsprofielbuffer plaatsen na enkele berekeningen die de snelheid omzetten in encoderwaarden.
We hebben enkele problemen ondervonden bij het maken van de code voor het bewegingsprofiel, zoals het niet terug uit kunnen bewegen van een bewegingsprofiel na een vorig bewegingsprofiel. We hebben enige vooruitgang geboekt door de instelling van de motoren te wijzigen.
het is een heel technisch verhaal, maar zoals is te lezen wordt er flink vooruitgang geboekt. Over 2 weken wil Team Rembrandts de robot helemaal klaar hebben voor de start van alle testen en vaardigheden voor de competitie in de USA.
Voor meer gedetailleerde informatie, bezoek de website van Team Rembrandts